Hi All,
Welcome back, I am Chakrapani Upadhyaya a full stack engineer.
I this article we will learn how to handle the state using redux toolkit.
Why to wait lets begin...
Step 1 : Creating New React Application
Go to any favorite drive open command prompt there and run the below command
D:\React JS> create-react-app react-redux-toolkit-app
Application created
Redirect to application folder
D:\React JS> cd react-redux-toolkit-app
Open the Project in VS Code
D:\React JS\react-redux-toolkit-app> code .
Remove all the unused files from source code
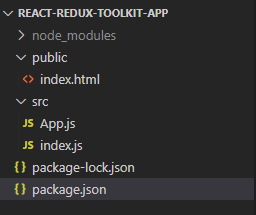
Now folder structure looks like below
Go to index.html and clean up the code like below
<!DOCTYPE html>
<html lang="en">
<head>
  <title>Document</title>
</head>
<body>
  <div id="root"></div>
</body>
</html>
Next go to App.js and clean up the unused reference and code, code should look like below
function App() {
  return (
    <div>
      <h1>Hello React App</h1>
    </div>
  );
}

export default App;
finally, we will clean the code for index.js
import React from 'react';
import ReactDOM from 'react-dom/client';
import App from './App';

const root = ReactDOM.createRoot(document.getElementById('root'));
root.render(
    <App />
);
That's it its time to run the application
D:\React JS\react-redux-toolkit-app> npm start
Boom!!!!! its running without any issues
Step 2: Set up the Redux to Manage state
Sounds good we will start configuring the state
Lets Add the Redux Toolkit and React-Redux packages to our project
npm install @reduxjs/toolkit react-redux
Next, Lets create Redux State Slice, Add a new file named src/UserSlice.js. In that file, import the createSlice API from Redux Toolkit.
UserSlice.js
import { createSlice } from "@reduxjs/toolkit";


const UserSlice = createSlice({
    name: 'user',
    initialState: {
        userName: ''
    },
    reducers: {
        login: (state, action) => {
            console.log(action)
            state.userName = action.payload.userName
        },
        logout: (state) => {
            state.userName = ''
        }
    }
})

export const { login, logout } = UserSlice.actions

export default UserSlice.reducer
Create a file named src/store.js. Import the configureStore API from Redux Toolkit.
store.js
import { configureStore } from '@reduxjs/toolkit'
import userReducer from './userSlice'

export const store = configureStore({
  reducer: {
    user: userReducer,
  },
})
Create component called Login.js which will help us to login, once user logged in, detail(like userName) will be dispatched to redux store, next time user will retrieve the detail from Redux store(its same like sessions from other programming language)
Login.js
import React, { useState } from 'react'
import { login } from './userSlice'
import { useDispatch } from 'react-redux'

function Login() {
    const [loginUser, setUser] = useState('')
    const dispatch = useDispatch()
    return (
        <div>
            <h5>Login</h5>
            <hr />
            <input type='text' onChange={(e) => setUser(e.target.value)} />
            <br /><br />
            <button onClick={() =>
                dispatch(login({ userName: loginUser }))}>Login</button>
        </div>
    )
}

export default Login
Create one more component called dashboard, which will load after login and displays the welcome message and gives option for logout.
Dashboard.js
import React from 'react'
import { useSelector, useDispatch } from 'react-redux'
import { logout } from './userSlice'

function Dashboard() {

    const userName = useSelector((state) => state.user.userName)
    const dispatch = useDispatch()

    return (
        <div>
            <p>Welcome {userName}</p>
            <button onClick={() => dispatch(logout())}>Logout</button>
        </div>
    )
}

export default Dashboard
Now we can use the React-Redux hooks to let React components interact with the Redux store. We can read data from the store with useSelector, and dispatch actions using useDispatch.
Conditional rendering done in this component, Dashboard gets load if user is logged in(userName is not empty), else Login component will be loaded
App.js
import React, { useState } from 'react'
import { useSelector } from 'react-redux'
import Login from './Login';
import Dashboard from './Dashboard';

function App() {
  const userName = useSelector((state) => state.user.userName)
  return (
    <div>
      <h1>My Redux App</h1>
      {userName != '' ? <Dashboard /> : <Login />}
    </div>
  );
}

export default App;
Once the store is created, we can make it available to our React components by putting a React-Redux <Provider> around our application in src/index.js. Import the Redux store we just created, put a <Provider> around your <App>, and pass the store as a prop
index.js
import React from 'react';
import ReactDOM from 'react-dom/client';
import App from './App';
import { store } from './store'
import { Provider } from 'react-redux'

const root = ReactDOM.createRoot(document.getElementById('root'));
root.render(
  <Provider store={store}>
    <App />
  </Provider>
);
Now, any time you click the "Login" buttons:
- The corresponding Redux action will be dispatched to the store
- The user slice reducer will see the actions and update its state
- The <App> component will see the new state value from the store and re-render itself with the new data
Enter Anything and Click Login, Dashboard component will be loaded as shown below
If you click logout, logout action will be dispatched and userName set to empty. Automatically Login component will be loaded.
You can download complete Source Code here.
I hope you enjoyed this article.
That's it for right now, see you in next article until then take care bye bye 😄
.png)


