Hello All,
Good Morning, Good Afternoon, Good Evening what ever zone you are.
In This article we will learn that how to restrict access to your ASP.NET Web API to authorized users only.
Authentication:
Authentication is the process of verifying a user’s identification through the credentials and using those credentials to confirm the user’s identity.
For example, Chakri logs in with his username and password, and the server uses the password to authenticate Chakri.
Its really necessary to check that who can access our API, it makes our application more secure.
JWT:
JWT is called as JSON Web Token it is an open standard (RFC 7519) that defines self-contained way for securely transmitting information between Service and Client as a JSON object.
This information can be verified and trusted because it is digitally signed.
JWTs can be signed using a secret using HMAC algorithm or a public/private key pair using RSA or ECDSA.
JWT Structure:
Basically JSON Web Tokens consist of three parts which is separated by dots (.).
- Header
- Payload
- Signature
1.Header:
Header contains metadata about the type of token and the cryptographic algorithms used to secure its contents.
Example:
{
  "alg": "HS256",
  "typ": "JWT"
}
2.Payload:
The payload of a JWT is just a plain Javascript object. Here is an example of a valid payload object.
Example:
{
  "name": "Chakrapani U",
  "email": "chakri@test.com",
  "role": "admin"
}
2.Signature:
The signature part of a JWT is derived from the header and payload fields. You create the signature by combining the base64url encoded representations of the header and payload with a dot (.)
base64UrlEncode(header) + “.” + base64UrlEncode(payload)
How it Works?
Client should get the token, to access the restricted service.
First, Client will call the Authenticate service(Anonymous) and provide his credentials, he will receive the token if given detail is valid.
All other requests, he will send the token in the header part to get the response.
401 Unauthorized respond will be sent to client from service when he failed to set the token or wrong credentials.
Lets look into the same with simple example below.
Steps to Add Security:
Step1 : Creating the WEB API
1. Open Visual Studio
2. Create a New Project
3. Choose project "ASP.NET Core Web API"
4. Enter Project Name, Select Location and Click Next
5. Select Framework .NET Core 6.0 and Click Create
6. Delete the un-used classes and objects(deleted the highlighted class files)
- Microsoft.AspNetCore.Authentication.JwtBearer
- System.IdentityModel.Tokens.Jwt
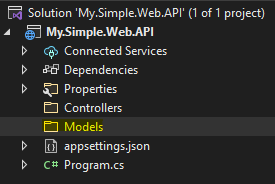
8. Cool, we have done with adding dependency. Its time to create the Entity Class, before that we will create the folder called Model and all the entity will be added in that.
Inside Models folder, Lets create class file called Learning.cs and the fields
namespace My.Simple.Web.API.Models
{
    public class Learning
    {
        public int LearningId { get; set; }
        public string Title { get; set; }
        public string Description { get; set; }
        public DateTime DateStarted { get; set; }
        public DateTime DateCompleted { get; set; }
    }
}
9. Lets create the controller called LearningController.cs
using Microsoft.AspNetCore.Http;
using Microsoft.AspNetCore.Mvc;
using My.Simple.Web.API.Models;

namespace My.Simple.Web.API.Controllers
{
    [Route("api/[controller]")]
    [ApiController]
    public class LearningController : ControllerBase
    {
        List<Learning> learningList;

        public LearningController()
        {
            learningList = new List<Learning>()
            {
                new Learning{LearningId=1,
                    Title="Test",
                    Description="Test Description",
                    DateStarted=DateTime.Now,
                    DateCompleted=DateTime.Now},
                new Learning{LearningId=1,
                    Title="Test2",
                    Description="Test Description2",
                    DateStarted=DateTime.Now,
                    DateCompleted=DateTime.Now}
            };
        }


        [HttpGet("learning-list")]
        public IActionResult Get()
        {
            return Ok(learningList);
        }
    }
}
9. Lets run the application and test the same in Swagger.
Great!! Our service is working in boom.
Step2 : Adding security to the WEB API
1. Create folder called Interfaces and add Interface called IJWTManager.cs
namespace My.Simple.Web.API.Interfaces
{
    public interface IJWTManager
    {
        string Authenticate(string userId, string password);
    }
}
3. Create New folder and call it as Repository then create the class file called JWTManager, this class implements the interface IJWTManager.
using Microsoft.IdentityModel.Tokens;
using My.Simple.Web.API.Interfaces;
using System.IdentityModel.Tokens.Jwt;
using System.Security.Claims;
using System.Text;

namespace My.Simple.Web.API.Repository
{
    public class JWTManager : IJWTManager
    {
        private readonly string key;

        public JWTManager(string key)
        {
            this.key = key;
        }
        public string Authenticate(string userId, string password)
        {
            //In Real time application user detail should be validate from database
            if (userId != "chakri" && password != "testPwd")
            {
                return null;
            }

            var tokenHandler = new JwtSecurityTokenHandler();
            var tokenKey = Encoding.UTF8.GetBytes(key);
            var tokenDescriptor = new SecurityTokenDescriptor
            {
                Subject = new ClaimsIdentity(new Claim[] {
                    new Claim(ClaimTypes.Name, userId)
                }),
                Expires = DateTime.UtcNow.AddHours(1),
                SigningCredentials = new SigningCredentials
                (new SymmetricSecurityKey(tokenKey),
                SecurityAlgorithms.HmacSha256Signature)
            };

            var token = tokenHandler.CreateToken(tokenDescriptor);
            return tokenHandler.WriteToken(token);

        }
    }
}
using Microsoft.AspNetCore.Authentication.JwtBearer;
using Microsoft.AspNetCore.Diagnostics;
using Microsoft.EntityFrameworkCore;
using Microsoft.IdentityModel.Tokens;
using Microsoft.OpenApi.Models;
using My.Simple.Web.API.Interfaces;
using My.Simple.Web.API.Models;
using My.Simple.Web.API.Repository;
using System.Text;

var builder = WebApplication.CreateBuilder(args);

ConfigurationManager Configuration = builder.Configuration;

builder.Services.AddControllers();
builder.Services.AddEndpointsApiExplorer();
builder.Services.AddSwaggerGen(
    c =>
    {
        c.SwaggerDoc("v1", new Microsoft.OpenApi.Models.OpenApiInfo
        {
            Title = "Last Bench Coder Beauty World",
            Version = "v1"
        });

        c.AddSecurityDefinition("Bearer", new OpenApiSecurityScheme
        {
            In = ParameterLocation.Header,
            Description = "Please insert JWT with Bearer into field",
            Name = "Authorization",
            Type = SecuritySchemeType.ApiKey
        });
        c.AddSecurityRequirement(new OpenApiSecurityRequirement {
        {
            new OpenApiSecurityScheme
            {
            Reference = new OpenApiReference
            {
                Type = ReferenceType.SecurityScheme,
                Id = "Bearer"
            }
            },
            new string[] { }
            }
        });
    });

builder.Services.AddAuthentication(x =>
{
    x.DefaultAuthenticateScheme = JwtBearerDefaults.AuthenticationScheme;
    x.DefaultChallengeScheme = JwtBearerDefaults.AuthenticationScheme;
}).AddJwtBearer(x =>
{
    x.RequireHttpsMetadata = false;
    x.SaveToken = true;
    x.TokenValidationParameters = new TokenValidationParameters
    {
        ValidateIssuerSigningKey = true,
IssuerSigningKey = new SymmetricSecurityKey(Encoding.UTF8.GetBytes("Test Key For JWT Token")),
ValidateIssuer = false,
ValidateAudience = false
};
});
builder.Services.AddSingleton<IJWTManager>(new JWTManager("Test Key For JWT Token"));
var app = builder.Build();
// Configure the HTTP request pipeline.
if (app.Environment.IsDevelopment())
{
app.UseSwagger();
app.UseSwaggerUI();
}
app.UseHttpsRedirection();
app.UseAuthentication();
app.UseAuthorization();
app.MapControllers();
app.Run();
using Microsoft.AspNetCore.Authorization;
using Microsoft.AspNetCore.Http;
using Microsoft.AspNetCore.Mvc;
using My.Simple.Web.API.Interfaces;

namespace My.Simple.Web.API.Controllers
{
    [Route("api/[controller]")]
    [ApiController]
    public class LoginController : ControllerBase
    {
        private readonly IJWTManager _jwtAuth;
        public LoginController(IJWTManager jwtAuth)
        {
            _jwtAuth = jwtAuth;
        }

        [HttpPost]
        [Route("token")]
        [AllowAnonymous]
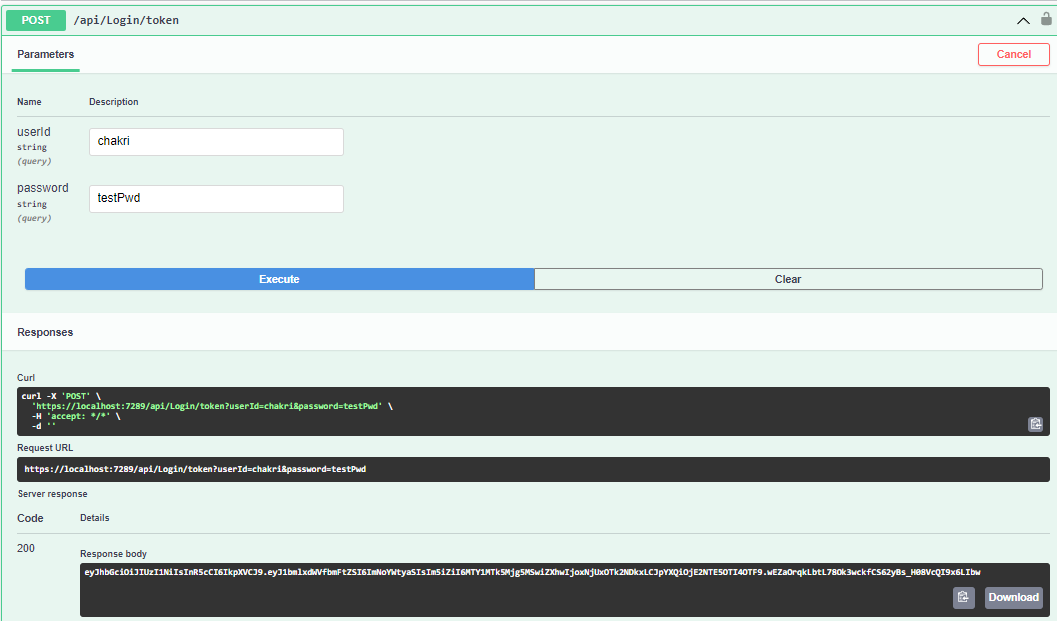
        public IActionResult Authenticate(string userId, string password)
        {

            var token = _jwtAuth.Authenticate(userId, password);

            return Ok(token);
        }
    }
}
        [Authorize]
        [HttpGet("learning-list")]
        public IActionResult Get()
        {
            return Ok(learningList);
        }
builder.Services.AddSwaggerGen(
    c =>
    {
        c.SwaggerDoc("v1", new Microsoft.OpenApi.Models.OpenApiInfo
        {
            Title = "Last Bench Coder Beauty World",
            Version = "v1"
        });

        c.AddSecurityDefinition("Bearer", new OpenApiSecurityScheme
        {
            In = ParameterLocation.Header,
            Description = "Please insert JWT with Bearer into field",
            Name = "Authorization",
            Type = SecuritySchemeType.ApiKey
        });
        c.AddSecurityRequirement(new OpenApiSecurityRequirement {
        {
            new OpenApiSecurityScheme
            {
            Reference = new OpenApiReference
            {
                Type = ReferenceType.SecurityScheme,
                Id = "Bearer"
            }
            },
            new string[] { }
            }
        });
    });
const accessToken = 'eyJhbGciOiJIUzI1NiIsInR5cCI6IkpXVCJ9.eyJ1bmlxdWVfbmFtZSI6ImNoYWtyaSIsIm5iZiI6MTY1MTk4NzA4MiwiZXhwIjoxNjUxOTkwNjgyLCJpYXQiOjE2NTE5ODcwODJ9.LiEP7JMKB27DNueVSo47JHNOgcoel5Y6XTuPtqm78lw'
fetch('https://localhost:7289/api/Learning/learning-list', {
headers: {
Authorization: 'Bearer ' + accessToken
}
})
.then(res => res.json())
.then(
result => {
setAdmins(result)
setIsLoading(false)
setError(null)
console.log(result)
},
error => {
setIsLoading(false)
setError(error)
}
)
.png)


