Ads

Web API 4 - ASP .NET Core Web API Using EntityFrameworkCore and MSSQL Server as Database

Hello All,

In this article we will develop Simple CRUD Operation Application Using ASP .NET Core API , For Database Side we are using MS SQL Server.

After this tutorial you will be able to develop the web API quickly.

Then why to wait, Lets start.

Introduction:

In this tutorial we well develop API to perform CRUD Operations. Through API we will be able to create, update, delete and select the Items.

Software Requirement:

Below mentioned software's are required to implement/develop the application.

1. Microsoft Visual Studio Latest Community Version(Click Here)


2. MS SQL Server Latest Express Edition(Click Here)


Designing the Web API:

For database connectivity and operations we are using the Entity Framework Core.

Note that we are using Code First Approach, Means Based on Classes in the application we will design the database.

1. Open Visual Studio


2. Create a New Project


3. Choose project "ASP.NET Core Web API"


4. Enter Project Name, Select Location and Clock Next


5. Select Framework .NET Core 6.0 and Click Create


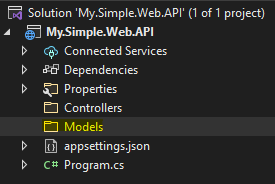
6. Delete the un-used classes and objects(deleted the highlighted class files)


7. Lets add dependencies using nuget package manager which is required for database connectivity and operations.

  • Microsoft.EntityFrameworkCore
  • Microsoft.EntityFrameworkCore.SqlServer
  • Microsoft.EntityFrameworkCore.Tools


8. Cool, we have done with adding dependency. Its time to create the Entity Class and Data Context
before that we will create the folder called Model and all the entity will be added in  that.


Inside Models folder, Lets create class file called Learning.cs and the fields

namespace My.Simple.Web.API.Models
{
    public class Learning
    {
        public int LearningId { get; set; }
        public string Title { get; set; }
        public string Description { get; set; }
        public DateTime DateStarted { get; set; }
        public DateTime DateCompleted { get; set; }
    }
}

Then, we will add the DbContext file and register our class in it. Registered class will be created as a table in the database.

So create the class file inside Models folder and call it AppDbContext.cs

using Microsoft.EntityFrameworkCore;

namespace My.Simple.Web.API.Models
{
    public class AppDbContext:DbContext
    {
        public AppDbContext(DbContextOptions<AppDbContext> options):base(options)
        {

        }

        public DbSet<Learning> Learning { get; set; }
    }
}

9. Oaky, now we have completed creating the DbContext file, next step is to define the connection string add the dependency to startup class

10. Go to appsettings.json and add the connection string

{
  "Logging": {
    "LogLevel": {
      "Default": "Information",
      "Microsoft.AspNetCore": "Warning"
    }
  },
  "AllowedHosts": "*",
  "ConnectionStrings": {
    "DevConnection" : "Server=SERVERNAME;Initial Catalog=MySimpleWebAPI_DB;
User Id=USERID;Password=********"
  }
}


Next Add the Dependency in Startup file

AppDbContext begins when the instance is created and ends when the instance is disposed.
UseSqlServer Configures the context to connect to a Microsoft SQL Server database.

A DbContext instance is designed to be used for a single unit-of-work. This means that the lifetime of a DbContext instance is usually very short.

Go to Program.cs file and add the below code

using Microsoft.EntityFrameworkCore;
using My.Simple.Web.API.Models;

var builder = WebApplication.CreateBuilder(args);

ConfigurationManager Configuration = builder.Configuration;

// Add services to the container.
builder.Services.AddDbContext<AppDbContext>(opt => 
opt.UseSqlServer(Configuration.GetConnectionString("DevConnection")));


In This we registers a DbContext subclass called AppDbContext as a scoped service in the ASP.NET Core API application service provider (which is the dependency injection container). 

The context is configured to use the SQL Server database provider and will read the connection string from appsettings.json.


11. Now we will push the class to database, means we will create the database and tables. to do we will run below commands.

Open Package manager console(Tools --> Nuget Package Manager Console --> Package Manager Console)

run the below command

add-migration "User Defined Comments"

Add-Migration: Creates a new migration class as per specified name with the Up() and Down() methods.


Migration folder created in the application root directory.


Please run the below command in package manager console.

update-database

Update-Database: Executes the last migration file created by the Add-Migration command and applies changes to the database schema.


Now you can see that database and table is created in the SQL Server.


Almost completed, Now its final step i.e. Creating Controller and Add CRUD methods.

12. Right Click on Controller folder and Add Controller

Add ==> Controller ==> Empty API Controller and name it to LearningController.cs

Create context object to perform CRUD operation, we use constructor injection to create the context object.


13. Create HttpGet method to retrieve the list of records.

     [HttpGet("learning-list")]
     public IActionResult Get()
     {
         return Ok(_context.Learning.ToList());
     }

14. Create HttpPost method to create/insert new records

        [HttpPost("learning-create")]
        public IActionResult Create(Learning learning)
        {
            _context.Learning.Add(learning);
            _context.SaveChanges();
            return Ok("success");
        }

15. Create HttpPut method to update the existing records

        [HttpPost("learning-update")]
        public IActionResult Update(Learning learning, int learningId)
        {
            var learningToUpdate = _context.Learning.Where(o => o.LearningId == 
                                    learningId).FirstOrDefault();

            if (learningToUpdate == null)
                return BadRequest();

            learningToUpdate.Title = learning.Title;
            learningToUpdate.Description = learning.Description;
            learningToUpdate.DateStarted = learning.DateStarted;
            learningToUpdate.DateCompleted = learning.DateCompleted;


            _context.Learning.Update(learningToUpdate);
            _context.SaveChanges();
            return Ok("success");
        }


16. Finally Create a HttpDelete method for Delete records from database.

        [HttpDelete("learning-delete")]
        public IActionResult Delete(int learningId)
        {
            var learningToDelete = _context.Learning.Where(o => o.LearningId == 
                                    learningId).FirstOrDefault();

            if (learningToDelete == null)
                return BadRequest();

            _context.Learning.Remove(learningToDelete);
            _context.SaveChanges();
            return Ok("success");
        }


Hurray, we have done with creating the api for crud operation. Now its tome for testing our api

How to Test?

Just run the application, There is an inbuilt open API tool available in our project, its called Swagger.

URL : https://localhost:7289/swagger

Just click on perticular end point to test the api.

Download Complete Source Code Here Download Source Code

That's it for this article, in this we have learnt the creation of API, handling database activity with Entity frame work Core.


Post a Comment

0 Comments
* Please Don't Spam Here. All the Comments are Reviewed by Admin.

#buttons=(Accept !) #days=(20)

Our website uses cookies to enhance your experience. Learn More
Accept !