In today's interconnected digital landscape, secure and efficient authentication methods are crucial for safeguarding user data and enhancing user experience. Single Sign-On (SSO) is a popular authentication mechanism that allows users to log in once and gain access to multiple applications without needing to re-enter credentials. OKTA, a leading identity and access management service, provides robust SSO capabilities. This article will guide you through integrating OKTA SSO authentication into your ASP.NET MVC application.
Prerequisites
Before diving into the integration process, ensure you have the following:
- An OKTA developer account (sign up here).
- Visual Studio installed.
- Basic knowledge of ASP.NET MVC and authentication mechanisms.
Step 1: Set Up Your OKTA Application
Step 2: Configure Your ASP.NET MVC Application
Install-Package Auth0.AspNetCore.Authentication
builder.Services.AddAuth0WebAppAuthentication(options =>
{
    options.Domain = builder.Configuration["Auth0:Domain"];
    options.ClientId = builder.Configuration["Auth0:ClientId"];
});
app.UseAuthentication();
app.UseAuthorization();
using Auth0.AspNetCore.Authentication;

var builder = WebApplication.CreateBuilder(args);

// Add services to the container.

builder.Services.AddAuth0WebAppAuthentication(options =>
{
    options.Domain = builder.Configuration["Auth0:Domain"];
    options.ClientId = builder.Configuration["Auth0:ClientId"];
});

builder.Services.AddControllersWithViews();

var app = builder.Build();

// Configure the HTTP request pipeline.
if (!app.Environment.IsDevelopment())
{
    app.UseExceptionHandler("/Home/Error");
    // The default HSTS value is 30 days. You may want to change this
    // for production scenarios, see https://aka.ms/aspnetcore-hsts.
    app.UseHsts();
}

app.UseHttpsRedirection();
app.UseStaticFiles();

app.UseRouting();

app.UseAuthorization();

app.MapControllerRoute(
    name: "default",
    pattern: "{controller=Home}/{action=Index}/{id?}");

app.Run();
"Auth0": {
  "Domain": "OKTA DOMAIN",
  "ClientId": "CLIENT ID"
}
{
  "Logging": {
    "LogLevel": {
      "Default": "Information",
      "Microsoft.AspNetCore": "Warning"
    }
  },
  "AllowedHosts": "*",
  "Auth0": {
    "Domain": "OKTA DOMAIN",
    "ClientId": "CLIENT ID"
  }
}
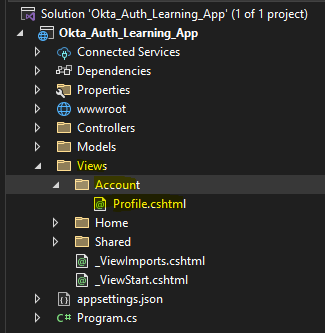
Next, Create the controller called AccountController.cs and then add following end points in it
using Auth0.AspNetCore.Authentication;
using Microsoft.AspNetCore.Authentication.Cookies;
using Microsoft.AspNetCore.Authentication;
using Microsoft.AspNetCore.Authorization;
using Microsoft.AspNetCore.Mvc;
using System.Security.Claims;
using Okta_Auth_Learning_App.Models;

namespace Okta_Auth_Learning_App.Controllers
{
    public class AccountController : Controller
    {
        [Route("login")]
        public async Task Login(string returnUrl = "/")
        {
            var authenticationProperties = new LoginAuthenticationPropertiesBuilder()
                // Indicate here where Auth0 should redirect the user after a login.
                // Note that the resulting absolute Uri must be added to the
                // **Allowed Callback URLs** settings for the app.
                .WithRedirectUri(returnUrl)
                .Build();

            await HttpContext.ChallengeAsync(Auth0Constants
.AuthenticationScheme, authenticationProperties);
        }

        [Route("callback")]
        public IActionResult CallBack()
        {
            return RedirectToAction("Home/Index");
        }

        [Route("profile")]
        [Authorize]
        public IActionResult Profile()
        {
            var model = new ProfileViewModel
            {
                Name = User.Identity.Name,
EmailAddress = User.Claims.FirstOrDefault(c => c.Type == ClaimTypes.Email)?.Value, ProfileImage = User.Claims
.FirstOrDefault(c => c.Type == "picture")?.Value
            };
            return View(model);
        }

        [Route("logout")]
        [Authorize]
        public async Task Logout()
        {
            var authenticationProperties = new LogoutAuthenticationPropertiesBuilder()
                // Indicate here where Auth0 should redirect the user after a logout.
                // Note that the resulting absolute Uri must be added to the
                // **Allowed Logout URLs** settings for the app.
                .WithRedirectUri(Url.Action("logouts", "account"))
                .Build();

            await HttpContext
.SignOutAsync(Auth0Constants.AuthenticationScheme, authenticationProperties);
            await HttpContext
.SignOutAsync(CookieAuthenticationDefaults.AuthenticationScheme);
}
[Route("logouts")]
public IActionResult Logouts()
{
return View();
}
}
}
public class ProfileViewModel
{
    public string Name { get; set; }
    [Display(Name = "Email Address")]
    public string EmailAddress { get; set; }
    [Display(Name = "Profile Image")]
    public string ProfileImage { get; set; }
}
@model Okta_Auth_Learning_App.Models.ProfileViewModel

@{
    ViewData["Title"] = "Profile";
}

<h2>@ViewData["Title"]</h2>

<div>
    <h3>@Model.Name</h3>
    <p>@Model.EmailAddress</p>
    @if (!string.IsNullOrEmpty(@Model.ProfileImage))
    {
        <img src="@Model.ProfileImage" alt="Profile Image" />
    }
</div>
@{
    ViewData["Title"] = "Logout";
}

<h2>@ViewData["Title"]</h2>

<div>
    <h5 style="color:red">Log out success! <a href="/login">
Click here to re login.</a></h5>
</div>
 @{
     if (!User.Identity.IsAuthenticated)
     {
         <li class="nav-item">
             <a class="nav-link text-dark" asp-area=""
asp-controller="account" asp-action="login">Login</a>
         </li>
     }
     else
     {
         <li class="nav-item">
             <a class="nav-link text-dark" asp-area=""
asp-controller="account" asp-action="profile">Profile</a>
         </li>
         <li class="nav-item">
             <a class="nav-link text-dark" asp-area=""
asp-controller="account" asp-action="logout">Logout</a>
         </li>
     }
 }
- https://<<APPLICATION URL>>/ ==> BASE URL
- https://<<APPLICATION URL>>/callback ==> After Successful Login it will come here
- https://<<APPLICATION URL>>/logouts ==> After Successful logout it will come here
Enter the Credentials, after successful login you will be redirected to callback action in account controller.
Click on Profile Link
On Click Logout
Integrating OKTA SSO authentication into your ASP.NET MVC application enhances security and provides a seamless user experience by leveraging a centralized authentication service. By following this guide, you can efficiently set up and configure OKTA SSO, ensuring your application is secure and user-friendly.
For further customization and advanced features, refer to the OKTA Developer Documentation. Happy coding!
.png)


